
How to use IQ Tools
Every task in IQ Tools, in plain steps. Start with your first edit below; every other task is in the menu after it.
Your first edit (5 minutes)
IQ Tools never changes your model as you type. Edits wait in the grid, marked as staged. Revit changes only when you click Sync ↑ and confirm in Sync Review. Sync is not Revit's Synchronize with Central: your teammates see the change only after you Synchronize with Central in Revit as usual.
- Install IQ Tools and open it from the IQTools tab in Revit.
- In the CATEGORIES list, click Doors and click Load. You should see: one row per door.
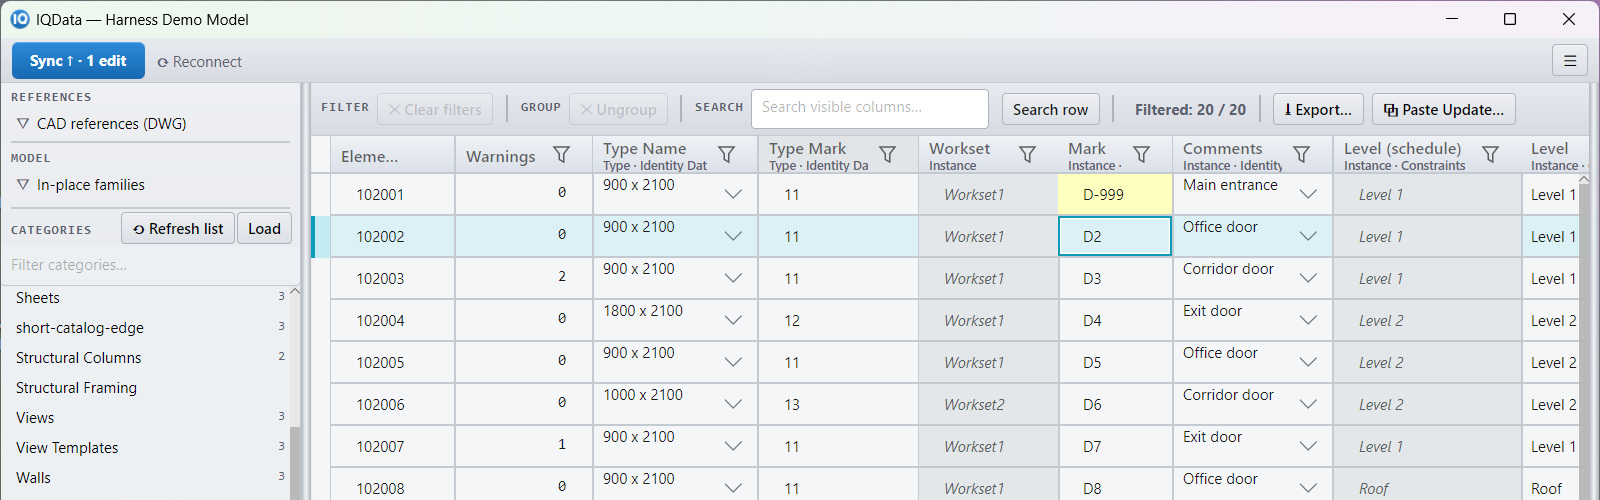
- Double-click one door's Mark cell, type a new Mark and press Enter. You should see: the cell marked as staged, and the button reads Sync ↑ · 1 edit.
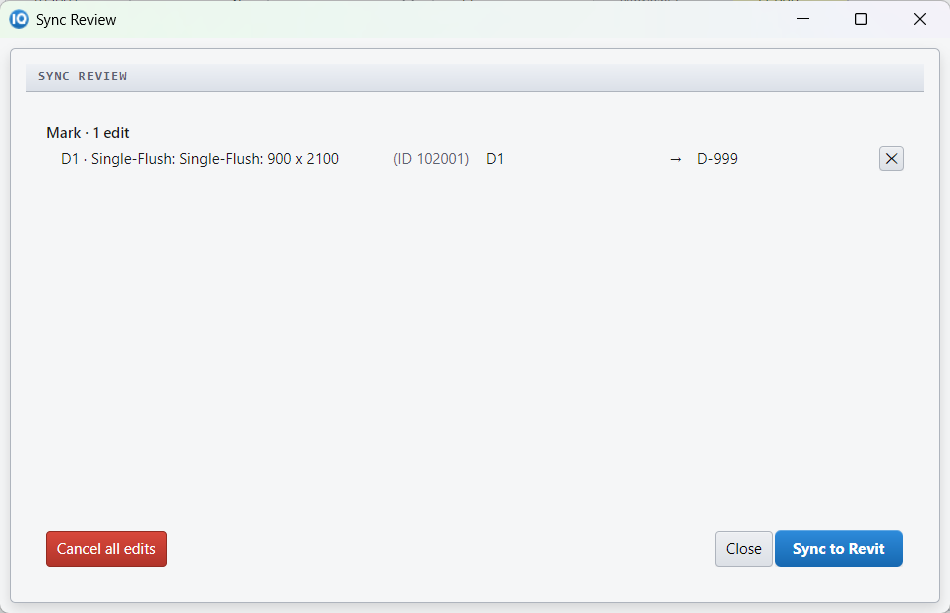
- Click Sync ↑. Sync Review lists your one change, with the old and new Mark.
- Click Sync to Revit. You should see: a message that starts “Synced to Revit —” and the staged mark gone.
- Check it in Revit: select that door and look at Mark in the Properties palette.
Changed your mind? Press Ctrl+Z once in Revit to undo the whole sync. See Discard a staged edit for edits you have not synced yet.
Trial and licence
A new install starts a 14-day trial with every feature on this page. When the trial ends:
- You can still open IQ Tools, load categories, search, filter and export, and select, zoom to or isolate elements in Revit.
- You can't stage new edits or sync them to Revit until you activate a licence.
- Edits you had already staged are kept, ready to sync once you activate.
All tasks
Each task is a few numbered steps. For how staging and Sync work in detail, see the Sync Review model.
Get started
Install IQ Tools and open it
- Download the installer from iqtoolspro.com/download.
- Close Revit.
- Right-click the IQ Tools MSI and choose Install. You need administrator rights; if you don't have them, ask IT.
- Start Revit and open your model.
- The first time, Revit asks about the signed IQ Tools add-in. Choose Always Load.
- You should see: an IQTools tab on the Revit ribbon.
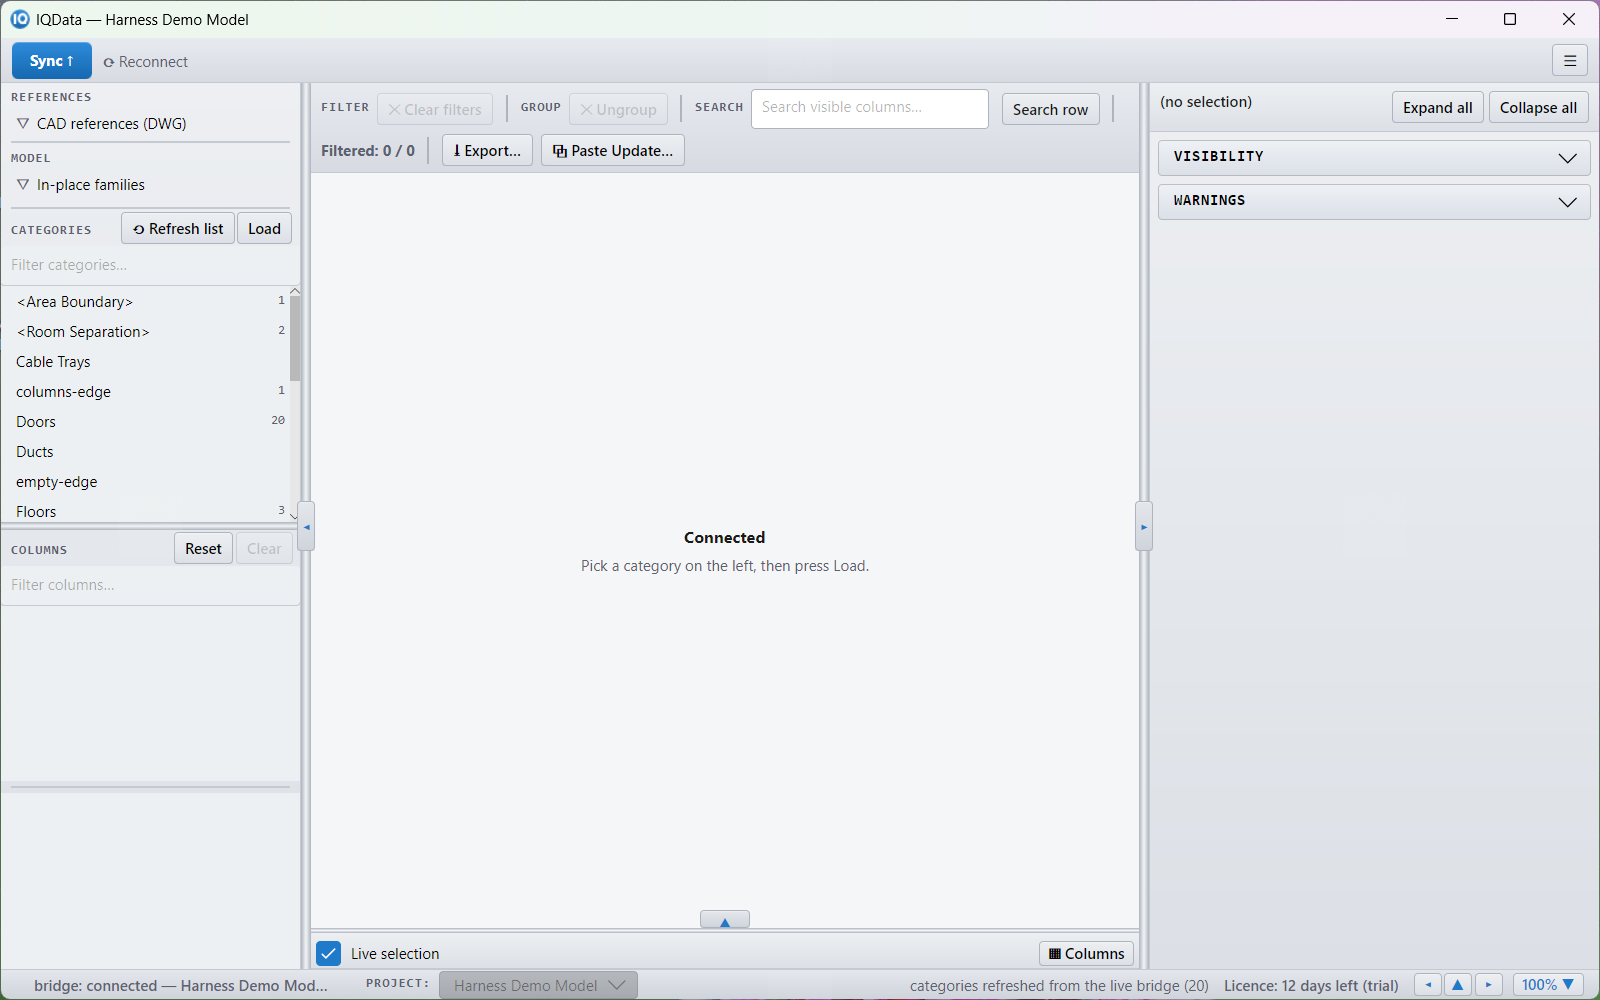
- On the IQTools tab, click IQData. The IQ Tools window opens beside Revit and connects to the open model.
- You should see: the project name and your trial days in the footer, and the CATEGORIES list on the left.

Reconnect after Revit restarts
- If you close and reopen Revit, or open a different model, click ⟳ Reconnect on the toolbar (Ctrl+Shift+R).
- IQ Tools connects to the model that is open in Revit.
Change, review and sync
Change a value in a cell
- Double-click a cell, or select it and start typing.
- Press Enter to keep the new value, or Esc to cancel it.
- You should see: the cell marked as staged, and the Sync button counting it, for example Sync ↑ · 1 edit. Revit has not changed yet.
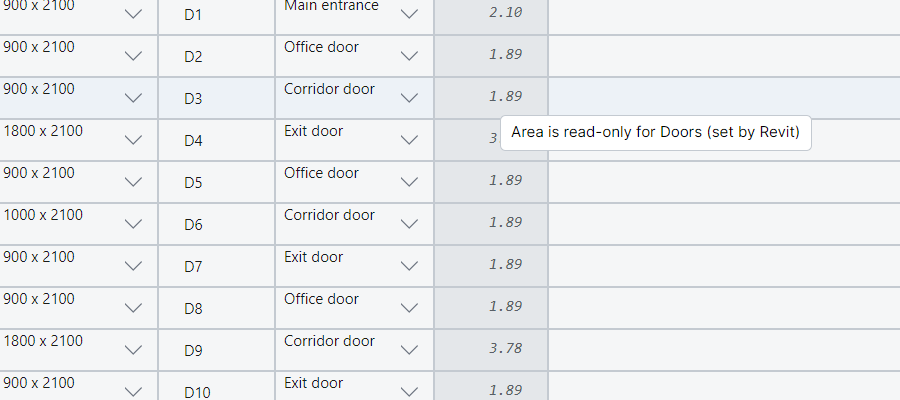
- If a cell cannot be edited, hover over it. A tooltip says why, for example “Area is read-only for Doors (set by Revit)”.
Discard a staged edit
- While you are still typing in a cell, press Esc. The cell goes back to its old value and nothing is staged.
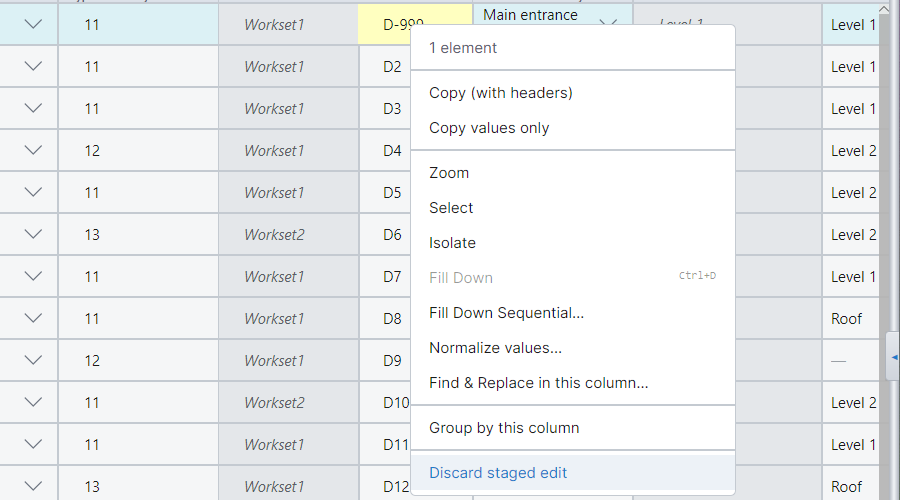
- To drop an edit you have already made, right-click the staged cell and choose Discard staged edit. The cell goes back to the value Revit holds.
- To drop every staged edit at once, click Sync ↑ and choose Cancel all edits in Sync Review.
Review and sync your changes to Revit
- Click Sync ↑ on the toolbar. It shows how many edits are staged.
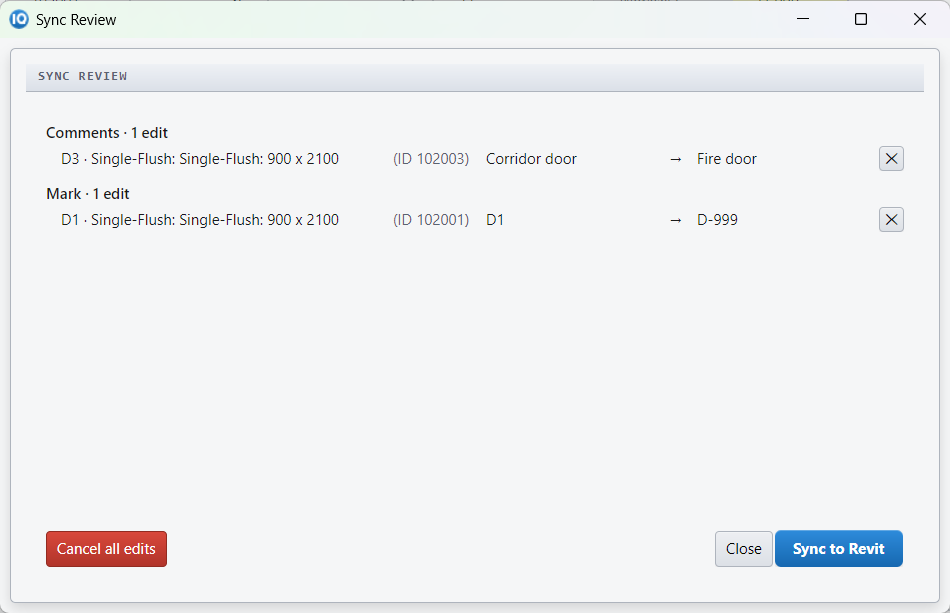
- Sync Review lists every staged change: element, parameter, old value and new value. A type rename is listed once, with the number of elements it affects.
- Check the list, then click Sync to Revit. Click Close to go back without syncing, or Cancel all edits to drop them.
- You should see: a message that starts “Synced to Revit —”, the staged marks gone, and the button back to Sync ↑. IQ Tools re-reads the categories you edited, so the grid shows the values Revit now holds.
- To undo a sync, press Ctrl+Z once in Revit. A sync is one step in Revit's Undo list, named IQTools: Sync. IQ Tools shows Revit's values again the next time you Load that category.
- Sync is not Revit's Synchronize with Central. Your teammates see the change only after you Synchronize with Central in Revit as usual.
Load and find
Load a category into the grid
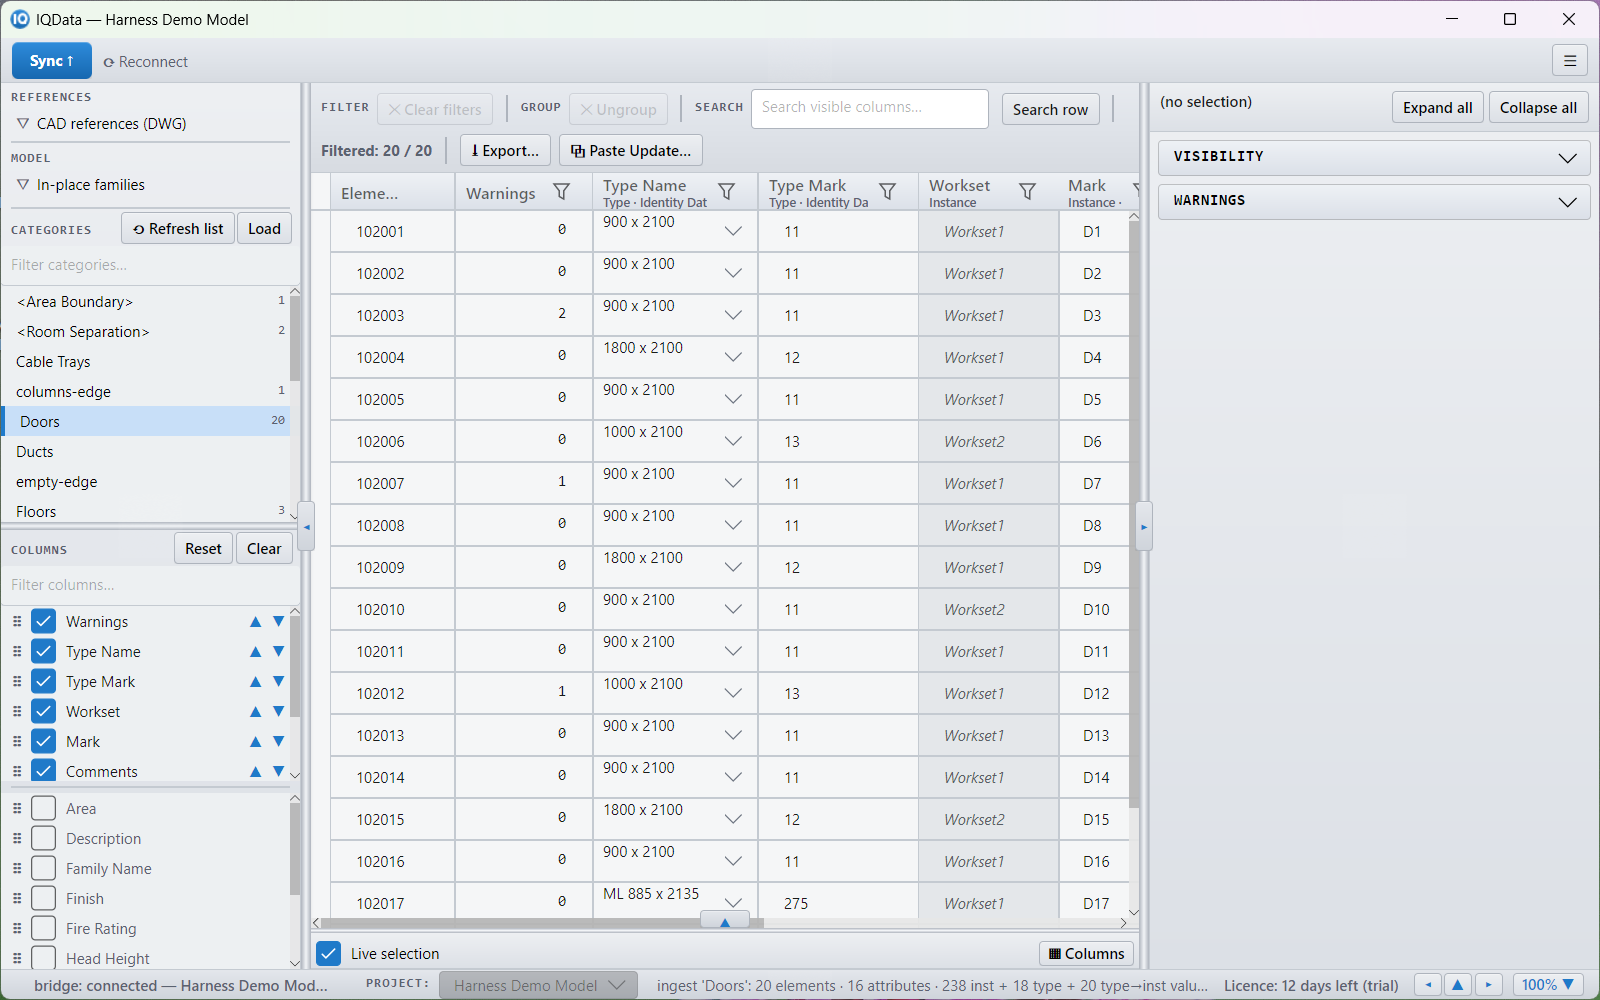
- In the CATEGORIES list, click the category you want, for example Doors. Type in Filter categories… to find it quickly.
- Click Load.
- You should see: one row per element in the grid, with that category's default columns.
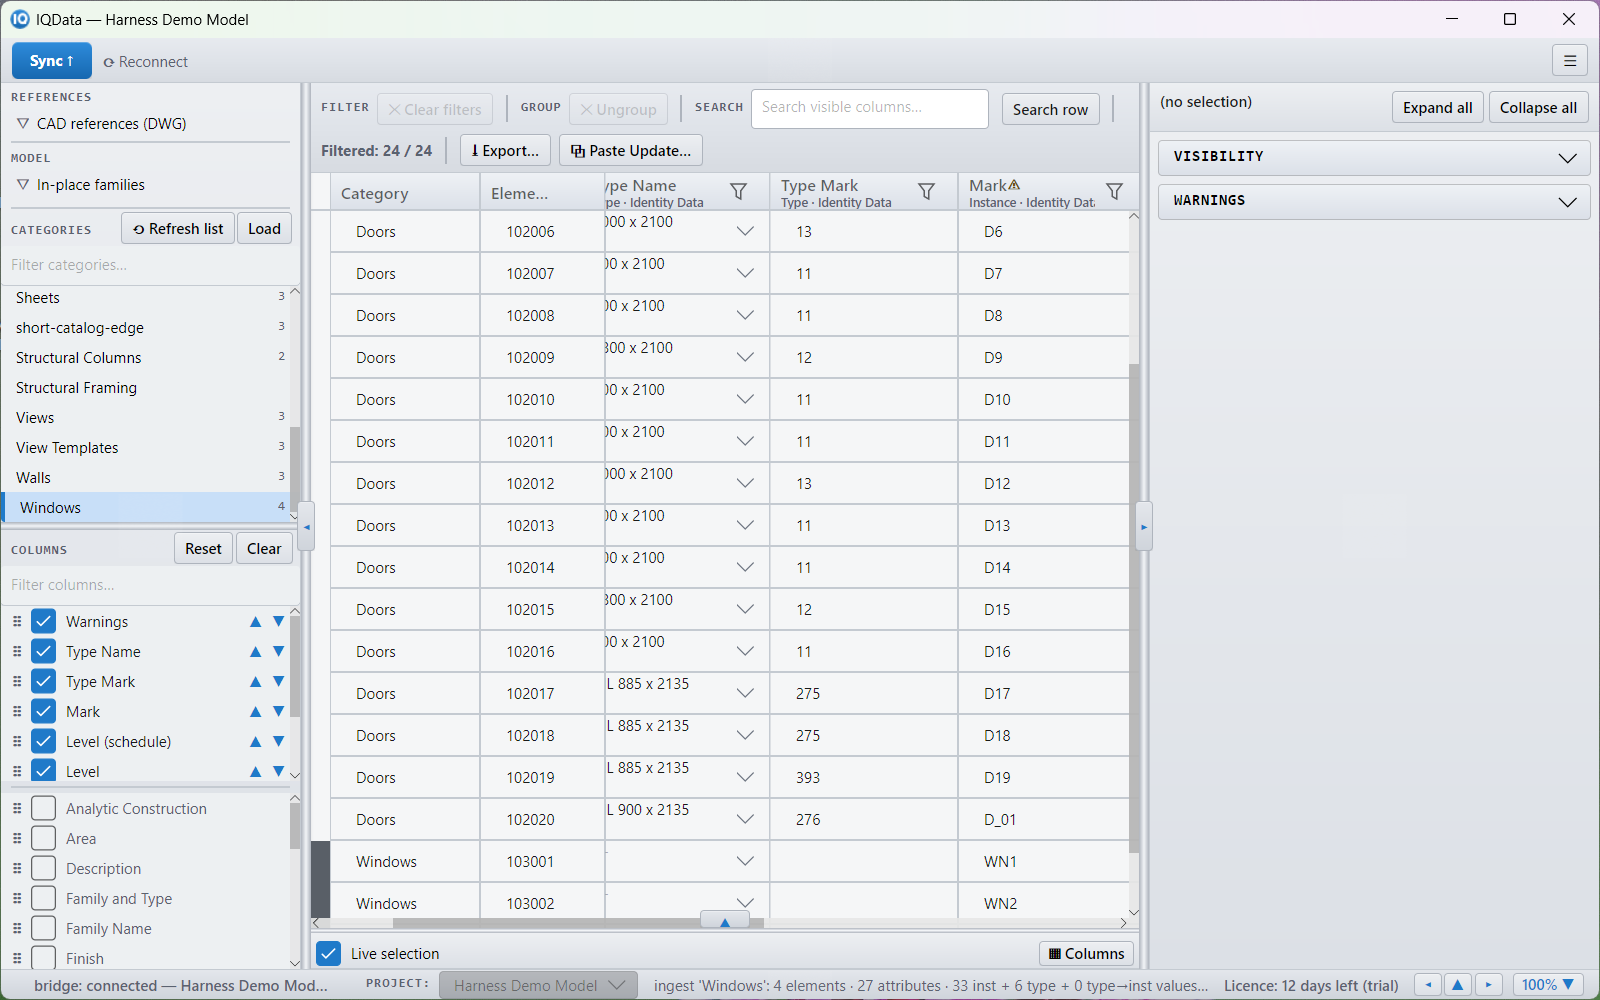
- To load more than one category, Ctrl+click each one before you click Load. The first column is then Category, and it stays in place when you scroll right.
Choose the columns you see
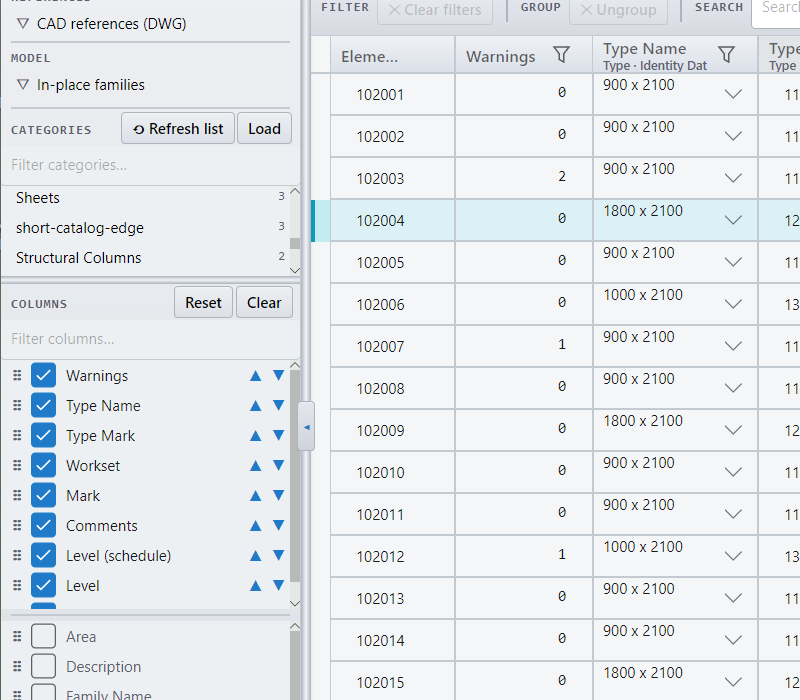
- With a category loaded, use the COLUMNS list in the sidebar. Tick a parameter to show it, untick it to hide it.
- Or right-click a column header and choose Hide column, Show all columns or Columns….
- Click Reset in COLUMNS to return the category to its default columns.
Search the grid
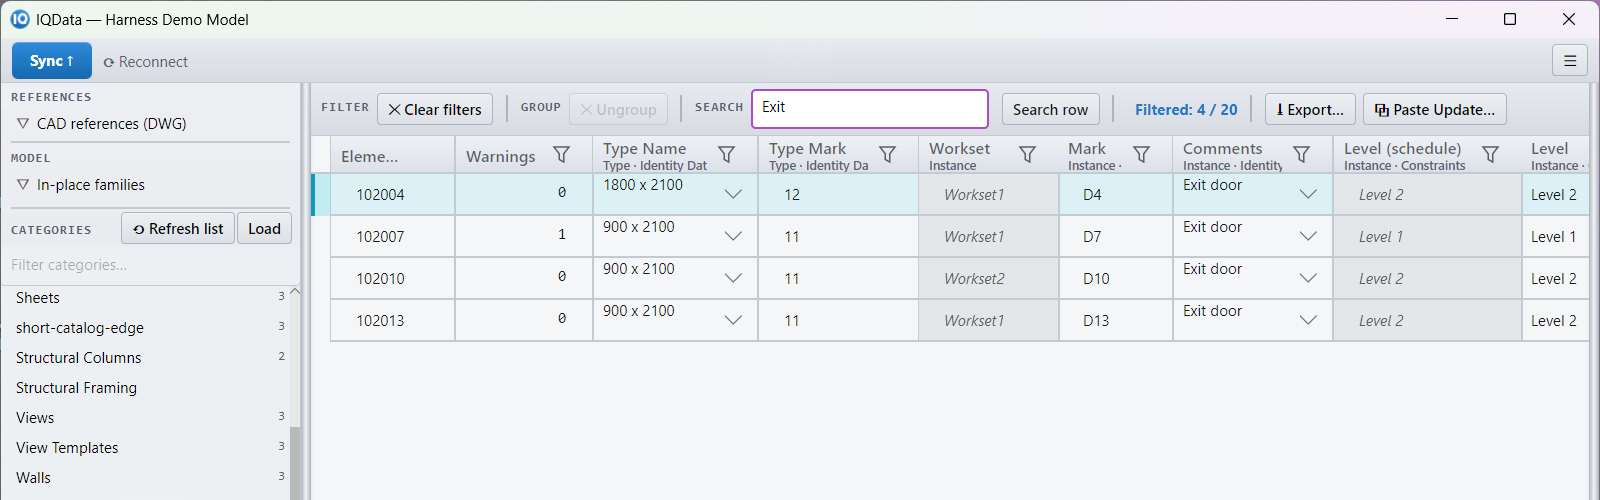
- Press Ctrl+F, or click the Search visible columns… box on the filter bar (the strip of buttons just above the grid).
- Type what you are looking for. The grid shows only the rows that match in the columns you can see.
- Clear the box to see every row again.
Filter a column
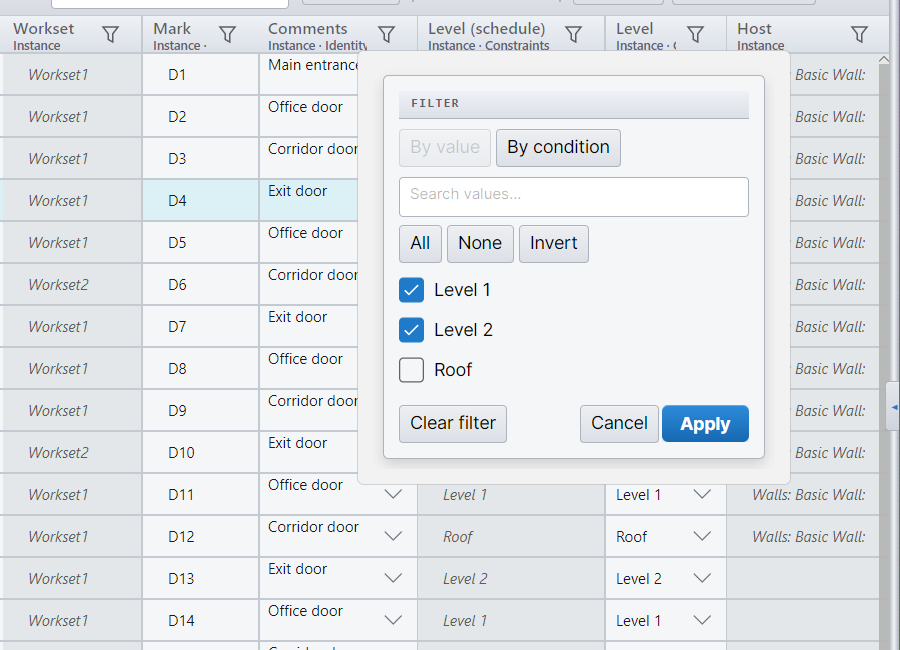
- Click the funnel button in a column header, or right-click the header and choose Filter….
- On By value, tick the values to keep. On By condition, pick a condition such as is blank or begins with. Click Apply.
- To remove filters, click Clear filter in the same place, or ✕ Clear filters on the filter bar to clear them all.
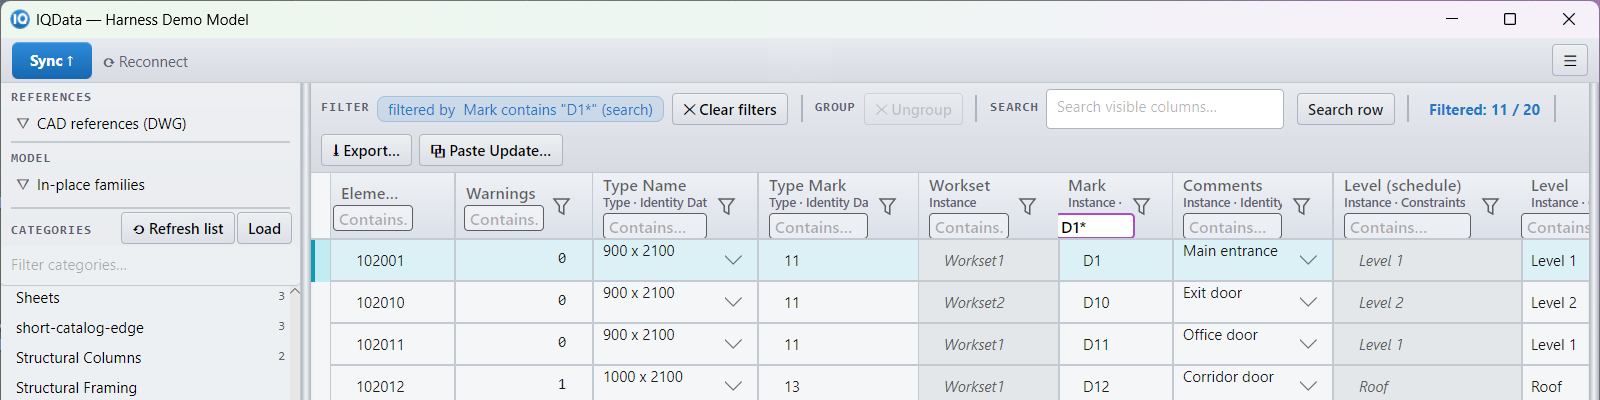
- To search inside each column, click Search row on the filter bar (Ctrl+Shift+F). A search box appears under every column header;
*and?work as they do in Excel.
Group rows by a column
- Right-click a cell or header in the column you want to group by.
- Choose Group by this column. Rows are grouped under each value, with a count.
- Use Expand all groups, Collapse all groups or Remove Grouping from the same menu.
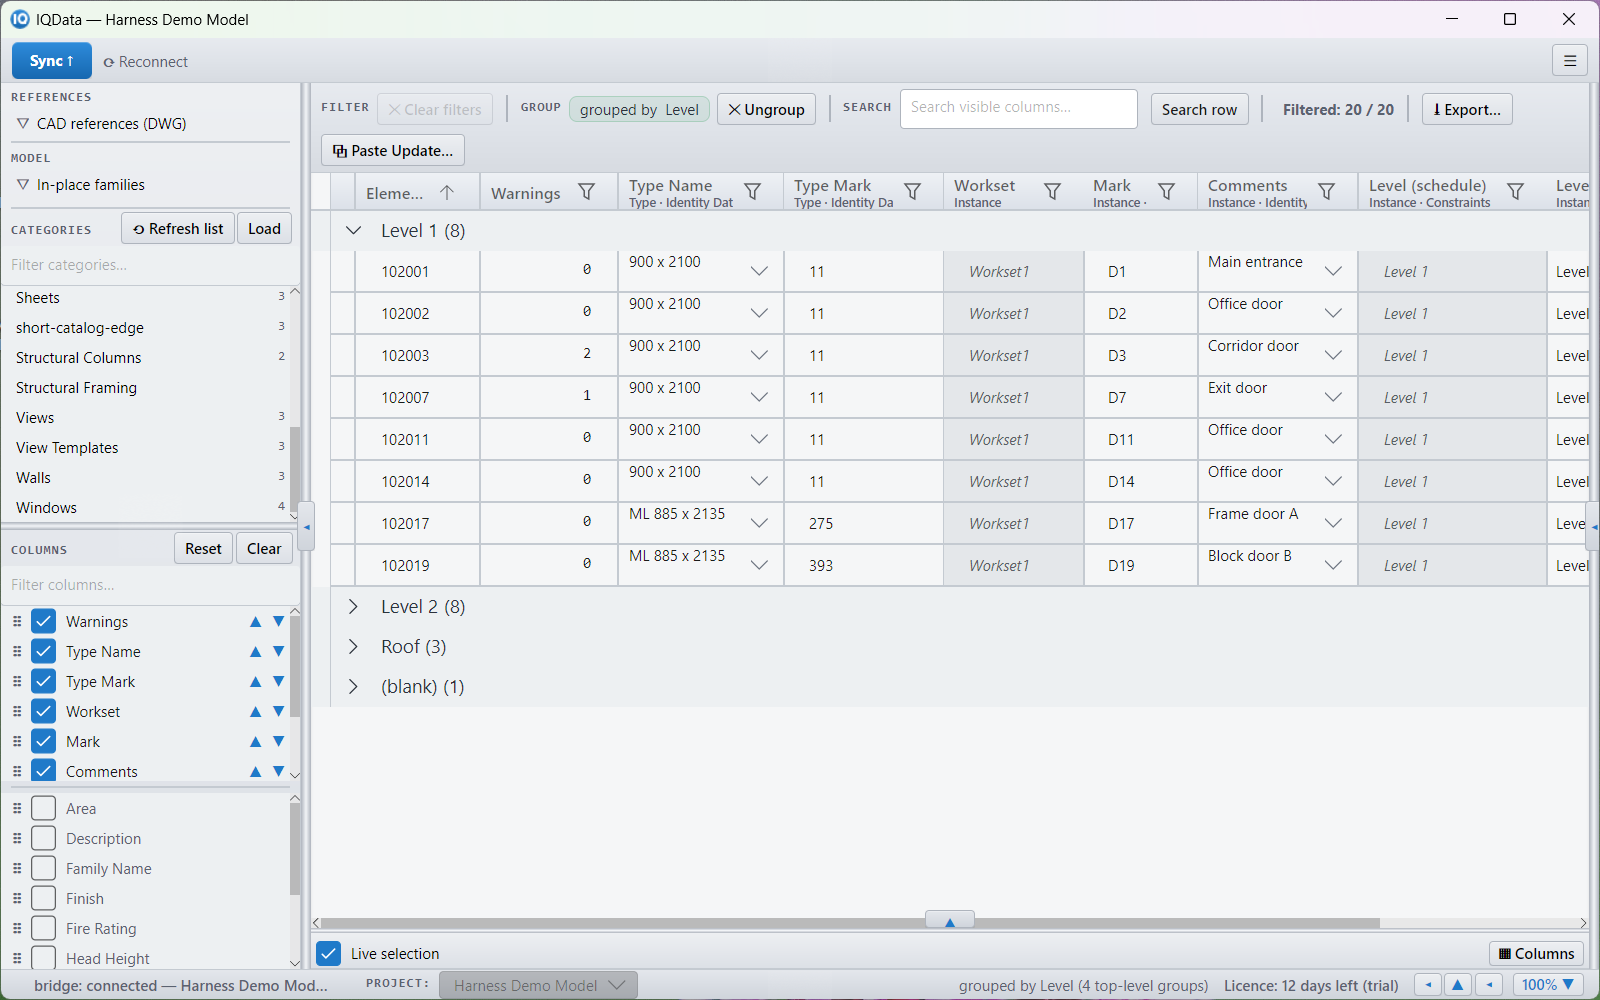
List in-place families and CAD references
- In the sidebar's MODEL list, click In-place families to load every category that has an in-place family, filtered to the in-place elements.
- In the REFERENCES list, click CAD references (DWG) to list the DWG files in the model, grouped by file or by placement.
Edit and fill
Edit in the Inspector
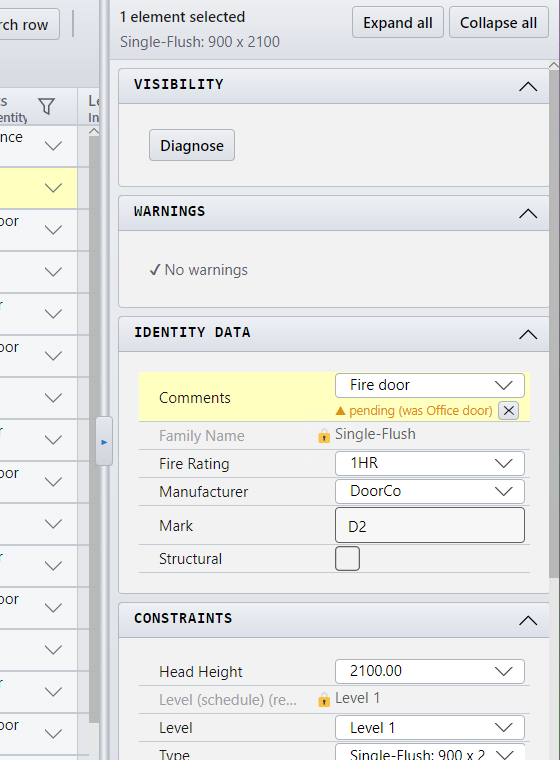
- Select one row. The Inspector on the right shows the element's parameters in sections. Use Expand all or Collapse all to open or close them.
- Change a value in the Inspector. It is staged, exactly like a grid edit.
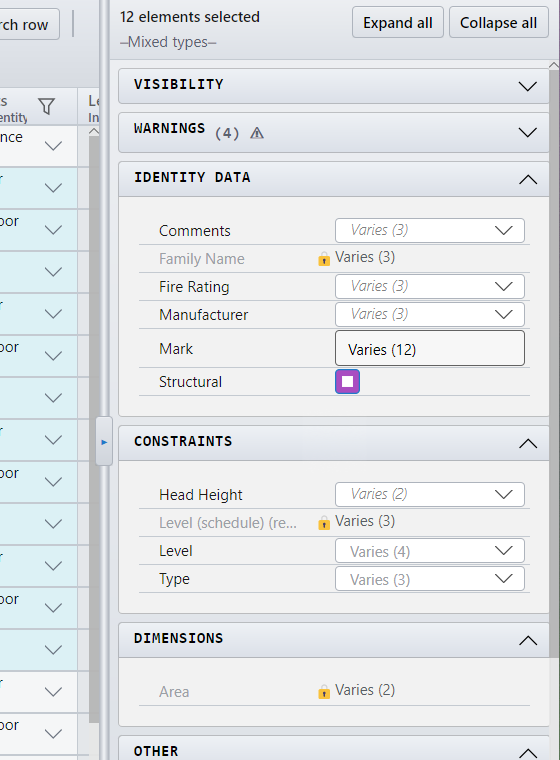
- Select several rows to edit them together. The Inspector header says how many elements are selected, for example “12 elements selected”, with a count per category when there is more than one. A parameter whose values differ shows Varies (N), where N is the number of different values. Type one value and it is staged for every selected element.
- Type parameters are in the Type Parameters section, at the bottom. A type parameter belongs to the type, so changing it changes every element of that type, including ones you have not selected. After a bulk change to a type parameter in the grid (for example Fill Down or Paste Update), the footer shows how many rows were in the batch and how many other elements inherit the change; click it to select them. A single edit in the Inspector does not show this count.
Change an element's type
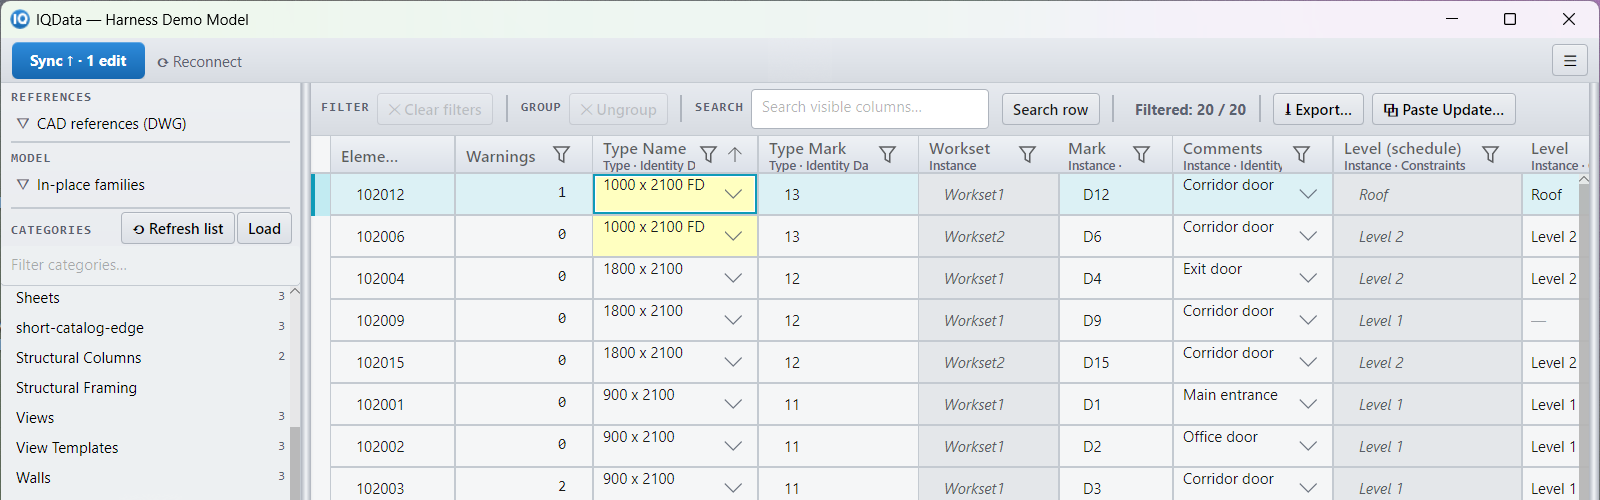
- Load the category, for example Doors, and show the Type column (Revit's Type parameter).
- Click the Type cell of the element. The dropdown lists the types you can change it to. Type part of a name to narrow the list.
- Choose the new type. The change is staged, and the row's type values update to the new type's values so you can check them before you sync.
Fill Down
- Select the rows you want to fill (click the first, Shift+click the last).
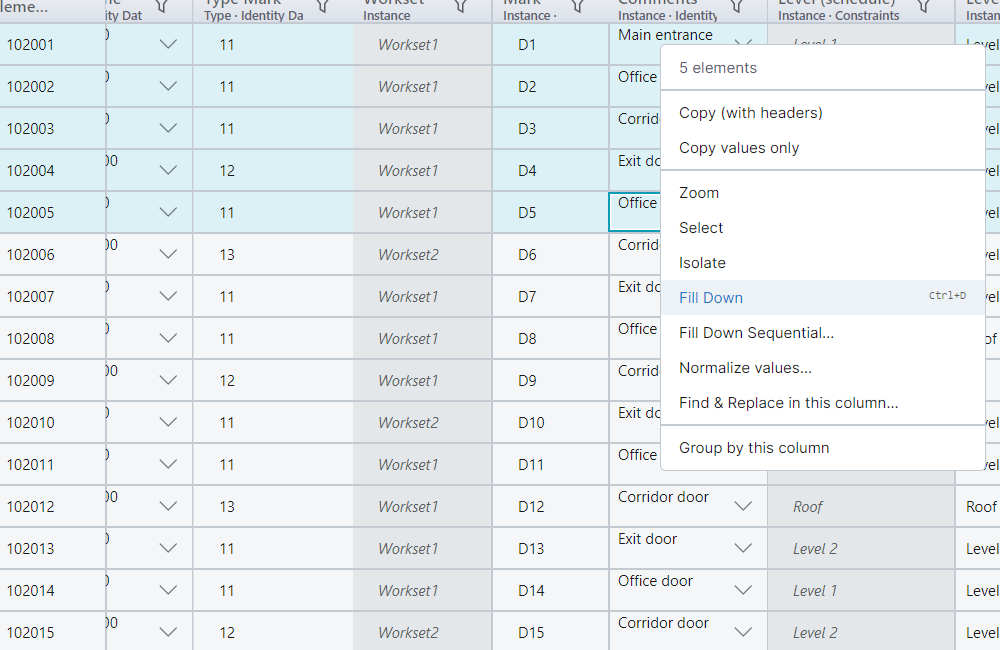
- Right-click the cell that holds the value you want, in the column to fill, for example Comments, and choose Fill Down. Every selected row gets that value in that column, and each change is staged.
- Don't fill Mark down: every element would get the same Mark. To number Marks, use Fill Down Sequential.
Fill Down Sequential (numbering)
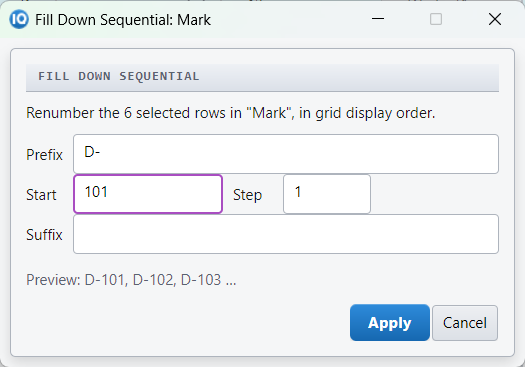
- Select the rows you want to number. They are numbered from top to bottom.
- Right-click a cell in the column to number, for example Mark, and choose Fill Down Sequential….
- Set the Prefix, Start, Step and Suffix, for example prefix D- and start 101, and click Apply. The new values are staged.
Find & Replace in a column
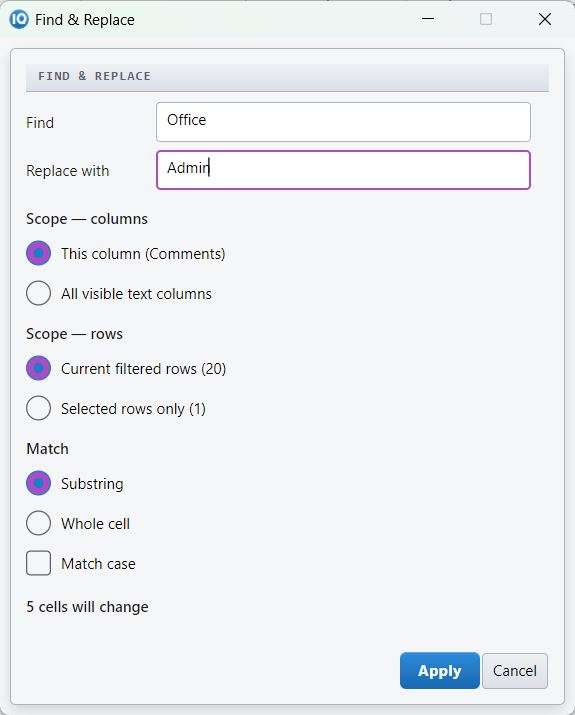
- Right-click any cell in the column and choose Find & Replace in this column…. It works on text columns of instance parameters, such as Mark or Comments. It is not offered on type parameter columns (such as Type Mark or Description), or on Rooms and Areas columns in this version.
- Type the text to find and the Replace with text. Choose whether to match part of a cell or the whole cell, and check the count of cells that will change.
- Click Apply. The changes are staged.
Normalize values (merge spelling variants)
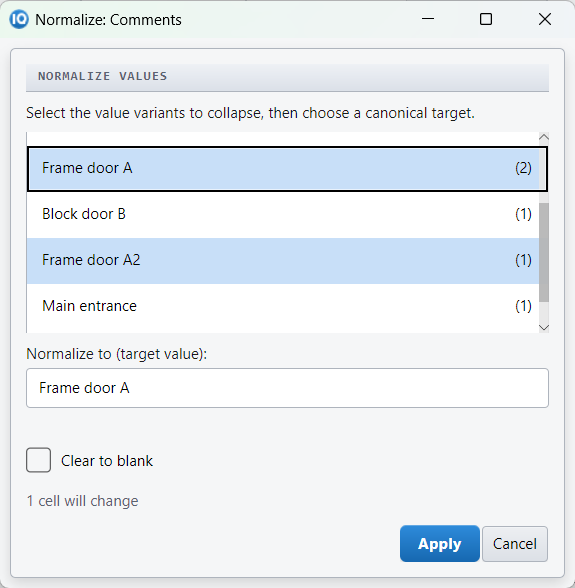
- Normalize merges spelling variants of the same value into one. Right-click a cell in the column you want to tidy and choose Normalize values….
- IQ Tools lists the column's values. Select the variants to merge, for example “Fire Rated”, “fire rated” and “FireRated”, and type the one value to keep under Normalize to.
- Click Apply. The changes are staged.
Rename types and materials
- To rename a type, edit the Type Name cell of any element of that type. The type is renamed once, and every element of that type shows the new name.
- To rename a material, load Materials and edit the Name cell.
- A name Revit would refuse is refused as you type it, with a short reason in the status line.
- Renaming a type changes the name everywhere Revit shows it, such as tags and schedules. View filters, schedule filters, Dynamo scripts or spreadsheets that match the old name may need updating. Linked models keep their own type names.
When Revit refuses a change
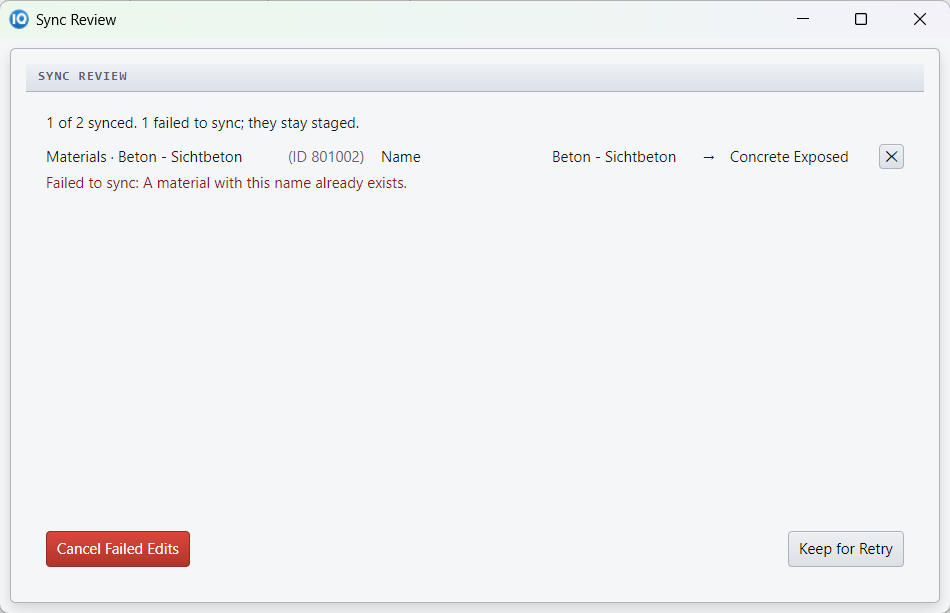
- If Revit refuses a change, Sync Review says how many synced, for example “1 of 2 synced”, and lists each refused row with the reason in plain words. The other rows still sync.
- Click Keep for Retry to keep the refused edits staged, fix the cause, and sync again. Or click Cancel Failed Edits.
- If Revit shows one of its own questions during a sync, IQ Tools waits and says so in the footer. Answer the question in Revit and IQ Tools carries on.
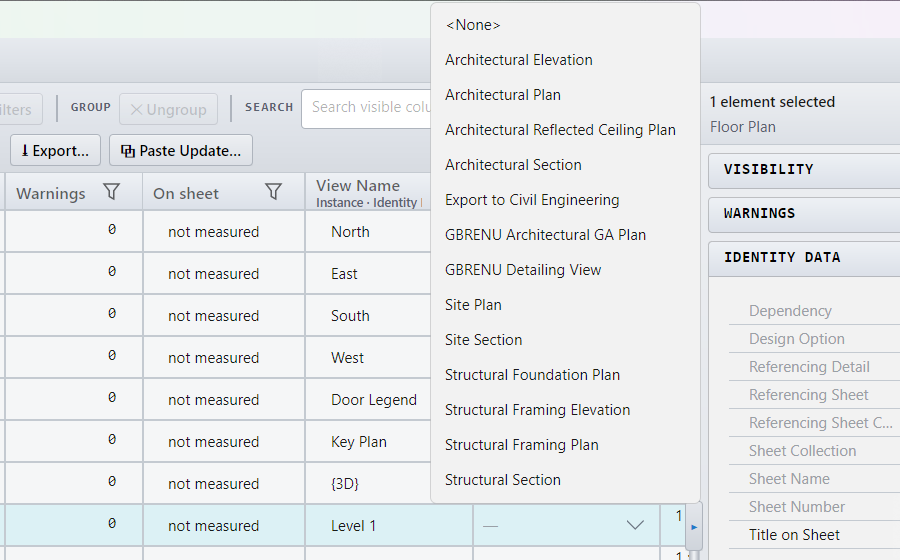
Set a view's View Template
- Load Views.
- Click the View Template cell of a view. It is a dropdown.
- Choose a template, or none. The change is staged.
Enter keynote values
- Load a category whose types carry a Keynote, for example Walls, and show the Keynote column.
- Click a Keynote cell. The dropdown lists every code in the model's keynote file as “code — description”. Type any word of the description to narrow the list.
- Choose a code. The change is staged, like any other edit.
- You can also type a code by hand. It is accepted when it is in the keynote file, and refused with “not a keynote code in this model's keynote file” when it is not.
- If no keynote file is loaded, the dropdown offers the values already used in the model, and the column header's tooltip says so.
- After you edit the keynote file in Revit, click ⟳ Reconnect to reload it.
Work with your Revit selection
Mirror your Revit selection
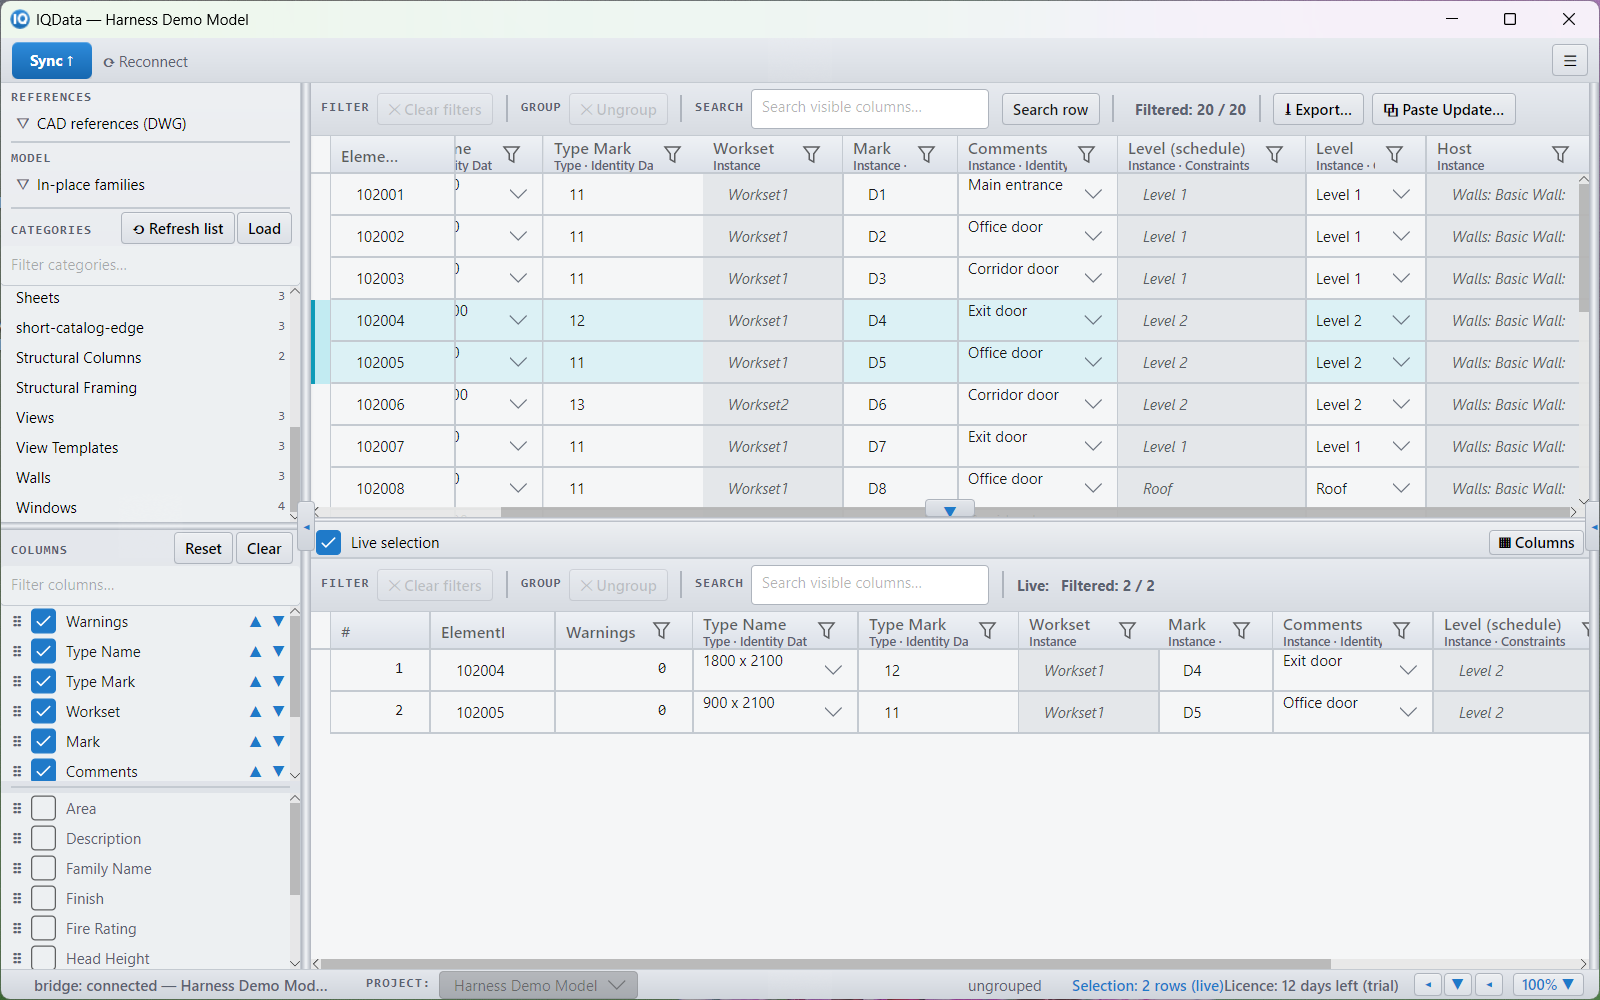
- Tick Live selection above the pane below the grid.
- Select elements in Revit. They appear in the pane, with their parameters.
- Use ▦ Columns in that pane to choose which parameters it shows.
Select, Zoom and Isolate in Revit
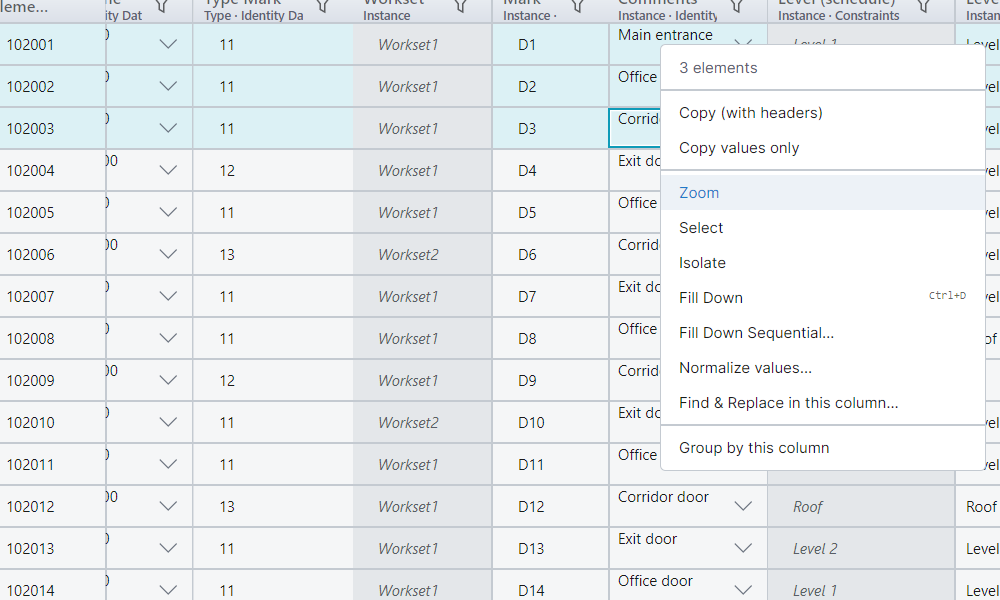
- Select one or more rows in the grid.
- Right-click and choose Select, Zoom or Isolate.
- Revit selects those elements, zooms the active view to them, or isolates them in the active view.
Select, Zoom and Isolate work with or without a licence.
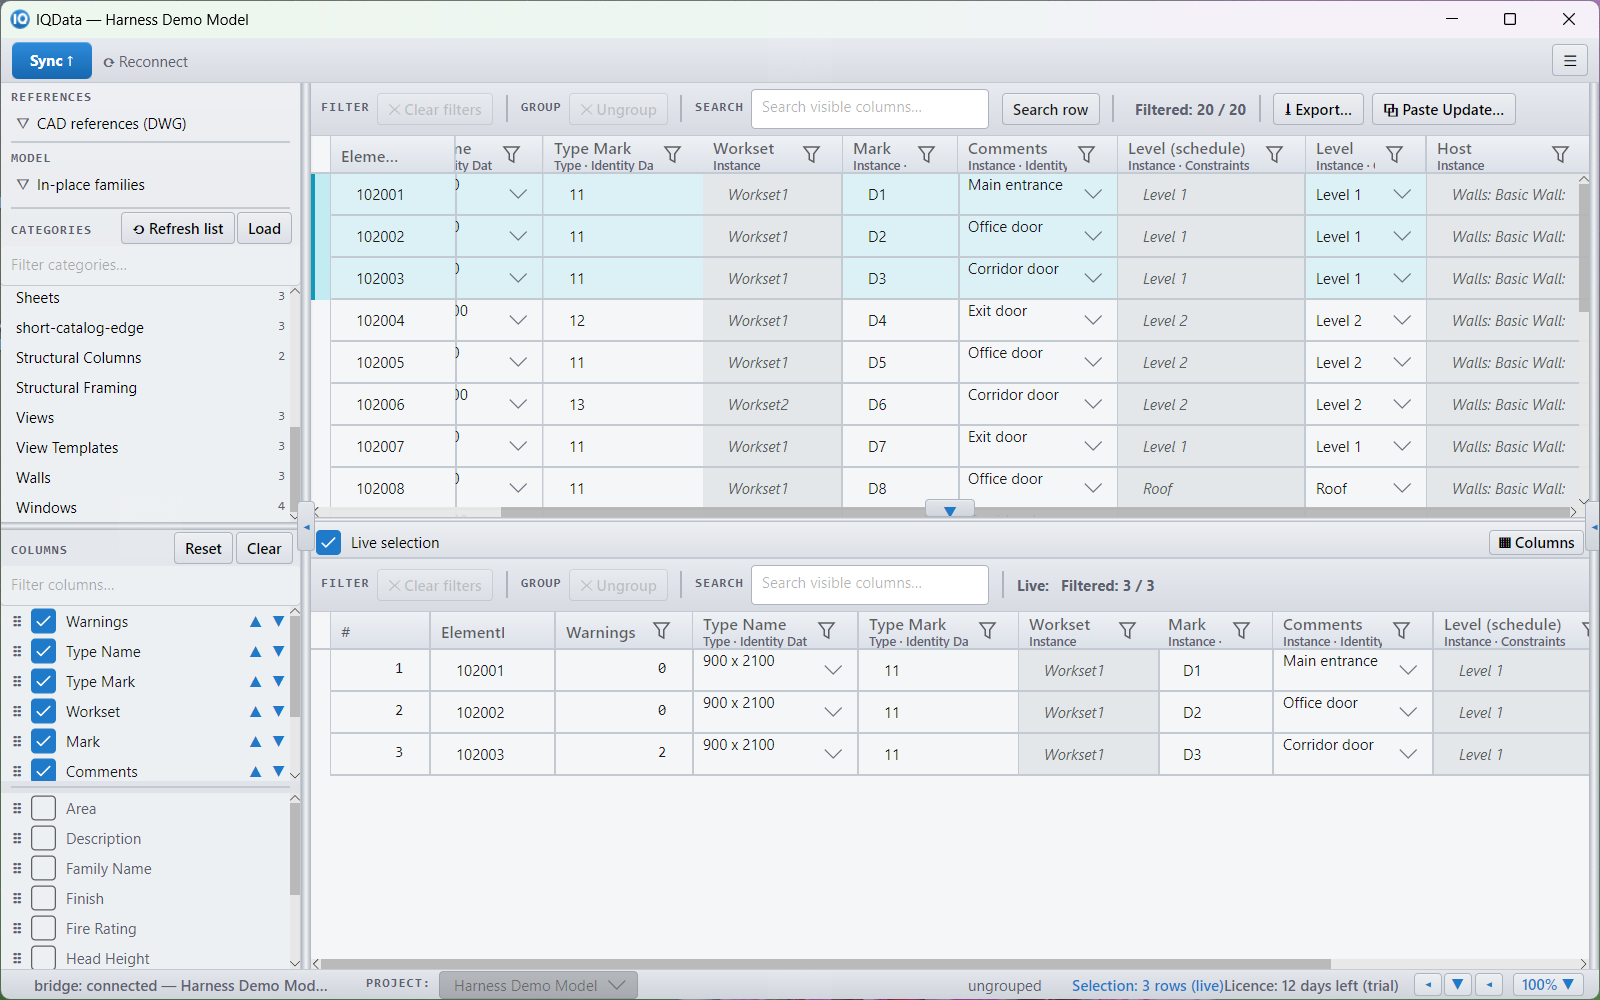
Edit and renumber in the Live selection pane
- Tick Live selection above the pane below the grid.
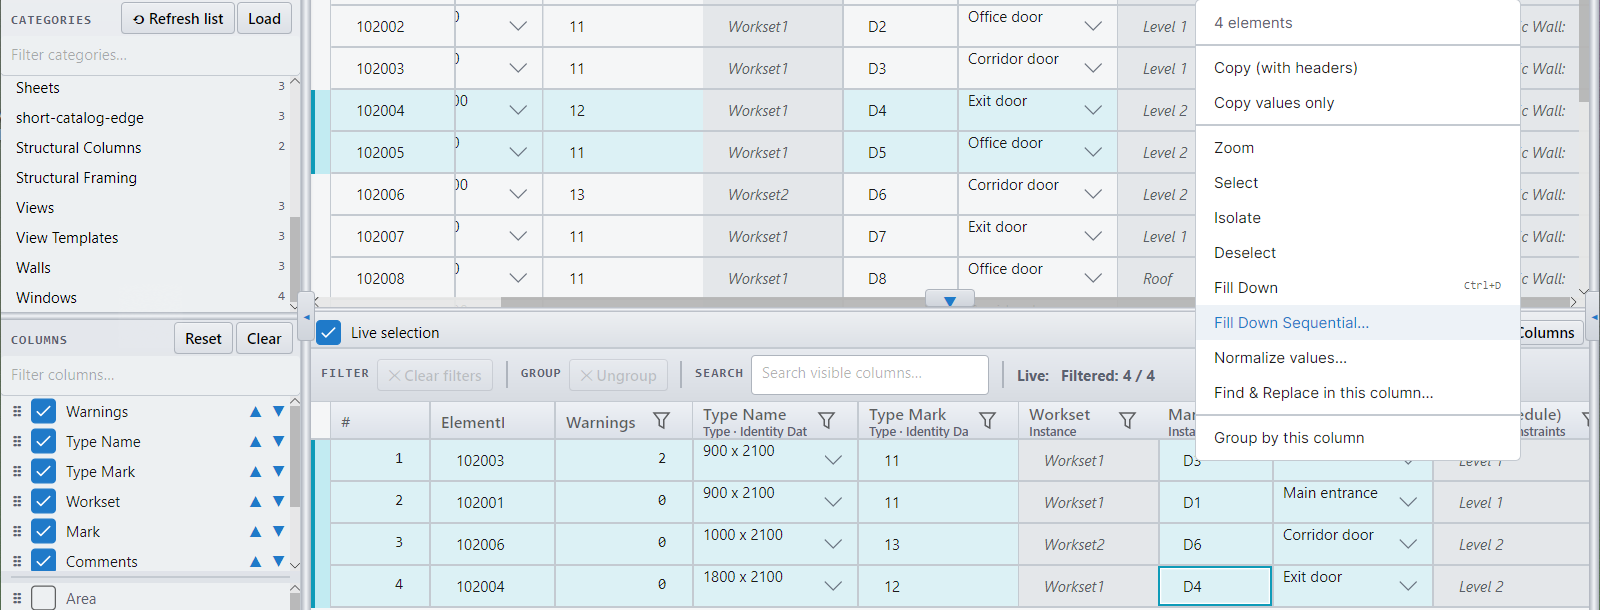
- In Revit, click the elements one at a time, in the order you want them numbered. The pane lists them in that order, and the # column shows it.
- To number them in another order, click a column header in the pane to sort it. The numbering follows the rows from top to bottom as the pane shows them.
- In the pane, click the first row and Shift+click the last to select them.
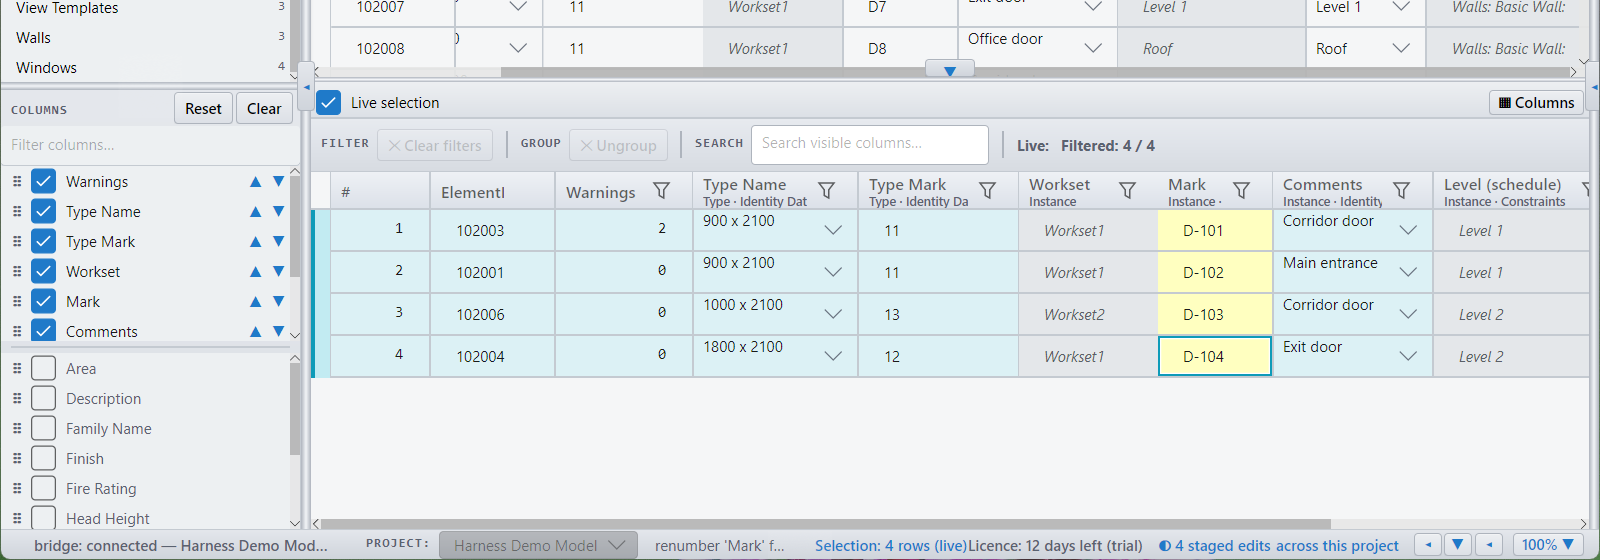
- Right-click a cell in the column you want to number, for example Mark, and choose Fill Down Sequential…. Set the prefix, start and step, and click Apply.
- Fill Down, Find & Replace in this column…, Normalize values… and typing in a cell all work in the pane, just as in the main grid.
- Click Sync ↑ and check Sync Review.
- If you click elements very quickly, or select several at once with a window, Revit reports them together and the pane lists them in element ID order. Check the # column before you renumber, or sort first.
Find elements with warnings
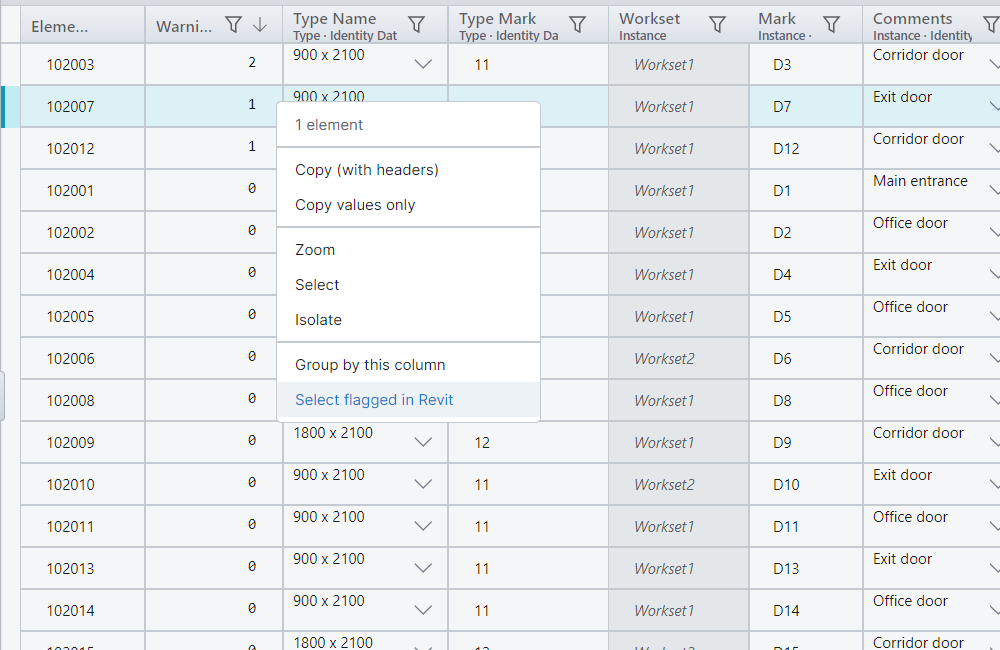
- Load a category. The Warnings column shows how many Revit warnings name each element. If you hid it, tick Warnings in COLUMNS.
- Use the Warnings column's filter, or sort it, to bring the elements with warnings to the top.
- Select those rows, right-click and choose Select, Zoom or Isolate to find them in Revit.
- Or right-click in the Warnings column and choose Select flagged in Revit. Every visible row with a warning is selected in the grid and in Revit.
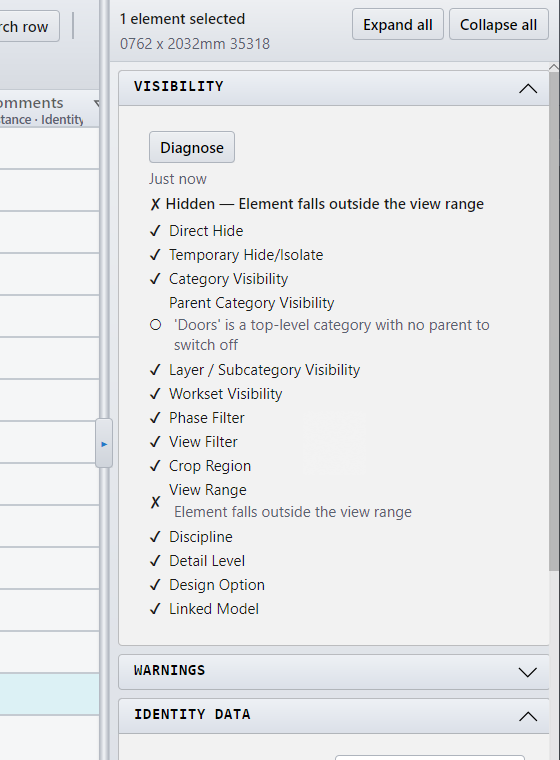
Why can't I see this element?
- Select one element, in the grid or the Live selection pane.
- In the Inspector, open the VISIBILITY section and click Diagnose.
- IQ Tools checks the element against Revit's active view and shows a verdict: visible, or the first reason it is hidden. The list below shows each check it ran.
- If the active view is a sheet, legend or schedule, IQ Tools checks the first model view it can use instead. It cannot diagnose a view template.
Work with Excel
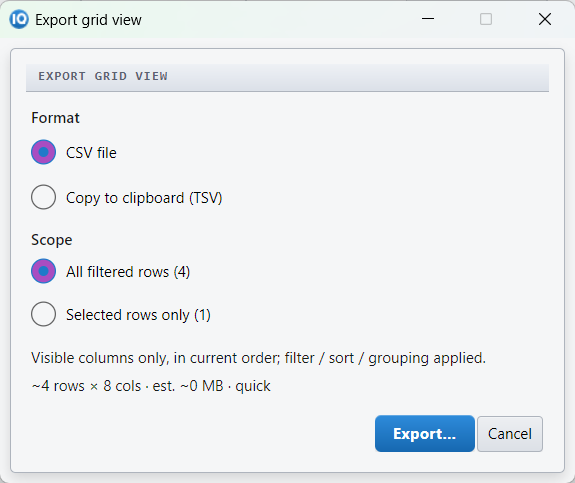
Export the grid to Excel (CSV)
- Set up the grid the way you want it: columns, filters, search.
- Click ⤓ Export… on the filter bar, or press Ctrl+E. The Export grid view window opens.
- Choose CSV file and click Export…, then open the file in Excel. Or choose Copy to clipboard (TSV) and paste straight into a sheet.
- Saves you building a Revit schedule and exporting it just to get a list into Excel.
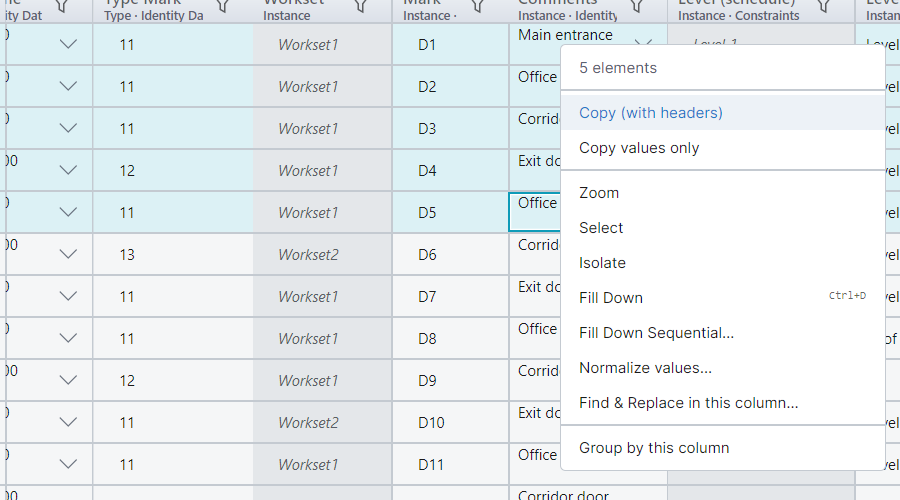
Copy rows to Excel
- Select the cells or rows you want.
- Right-click and choose Copy (with headers) or Copy values only.
- Paste into Excel.
- Saves you exporting the whole grid when you only need a few cells.
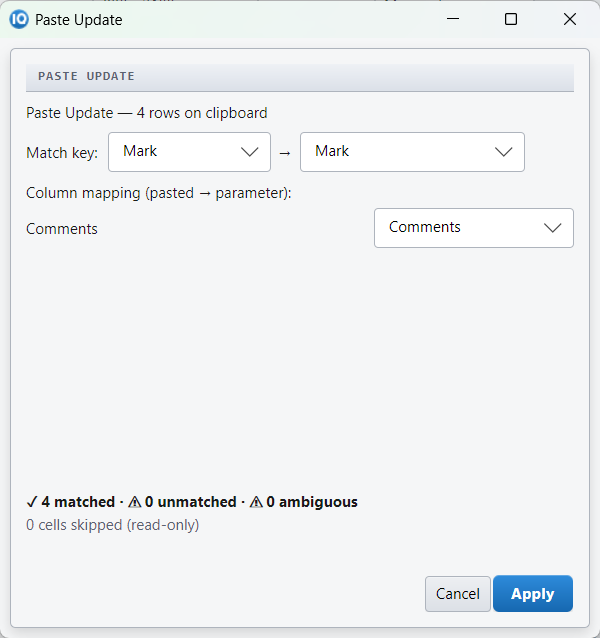
Paste Update from Excel
- Start from an export: export the grid, then edit the values in Excel. Keep the header row and a column that identifies each element, such as ElementId or Mark.
- In Excel, select the block (headers included) and copy it.
- In IQ Tools, click ⧉ Paste Update… on the filter bar, or press Ctrl+Shift+V. The Paste Update window shows what is on the clipboard.
- Check the Match key: the column IQ Tools uses to find each element in the grid. Then check the column mapping (pasted column → parameter).
- Click Apply. The changes are staged for Sync Review.
- If two parameters share a name, such as a project parameter “Mark” and Revit's own Mark, check the parameter in Sync Review before you sync, or paste with both columns loaded.
- Saves you opening each element's properties to type values in one by one.
Common jobs
Renumber doors or rooms along a corridor
- Tick Live selection, then in Revit click the doors or rooms one by one along the corridor, in walking order. See Edit and renumber in the Live selection pane.
- Check the # column in the pane matches your walking order.
- Select every row in the pane, right-click a Number (rooms) or Mark (doors) cell and choose Fill Down Sequential….
- Enter a prefix and start, for example W- and 101, and click Apply.
- Click Sync ↑, check the old and new numbers in Sync Review, and click Sync to Revit.
Fill in missing Marks
- Load the category, for example Doors.
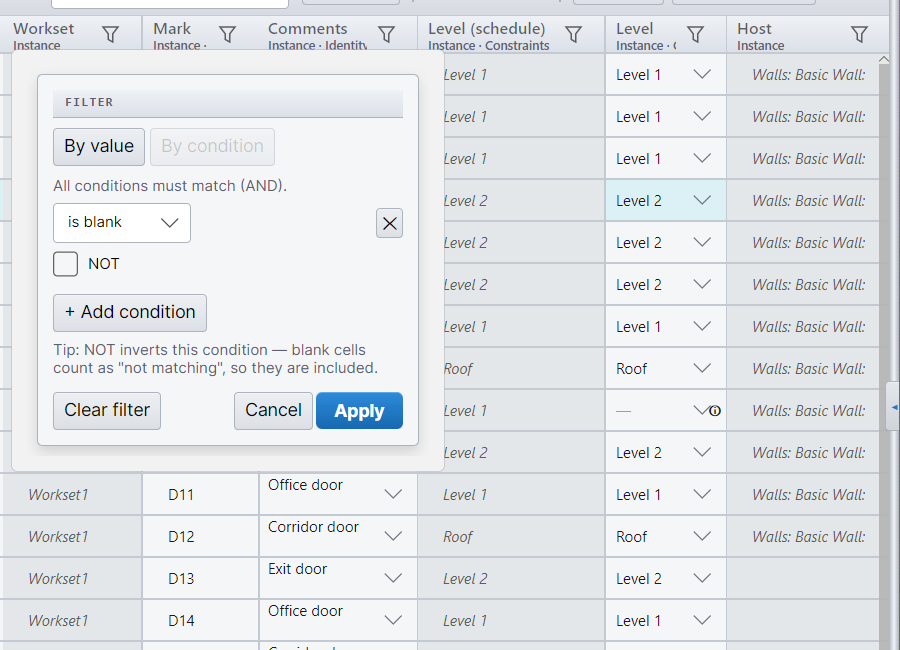
- Open the Mark column's filter, click By condition, choose is blank and apply it. The grid shows only the elements with no Mark.
- Press Ctrl+A in the grid to select every row the filter shows.
- Right-click a Mark cell, choose Fill Down Sequential…, enter a prefix and start, and click Apply.
- You should see: the rows leave the filtered list as they are numbered, because their Mark is no longer blank. An empty list means every element has a Mark.
- Sync.
Check sheets are complete before an issue
- Load Sheets. Drawn By, Checked By and Sheet Issue Date are among the default columns.
- Filter Sheet Issue Date by the condition is blank. The grid shows the sheets with no issue date.
- Press Ctrl+A, then type the date once in the Inspector's Sheet Issue Date row. It is staged for every selected sheet.
- You should see: the sheets leave the filtered list as soon as the date is staged, because they are no longer blank. The Inspector still shows them selected, with the staged date. An empty list means every sheet has a date.
- Clear that filter and repeat for Checked By and Drawn By.
- Sync.
Remove a prefix from many values
- Load the category, for example Doors, and filter the Mark column by the condition begins with and the prefix, for example “TMP-”.
- Right-click a Mark cell and choose Find & Replace in this column….
- Type the prefix in the find box and leave Replace with empty. Keep Substring, and set Scope — rows to the current filtered rows.
- Check the count of cells that will change and click Apply.
- Sync.
Update rooms from a program spreadsheet
- Load Rooms, with the columns you will update, for example Department.
- In Excel, copy the program table with its headers, including a column with each room's Number.
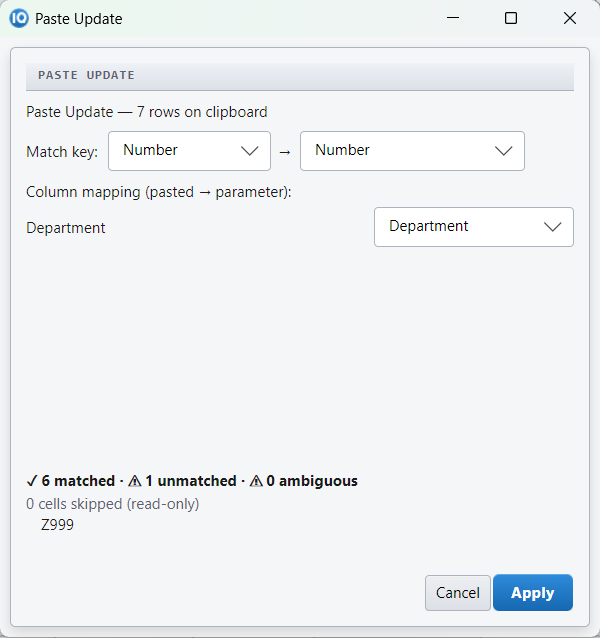
- In IQ Tools, press Ctrl+Shift+V. Set Match key to Number and check the column mapping.
- Read the match report, for example “38 matched · 2 unmatched · 0 ambiguous”. Unmatched rows are listed so you can follow them up; they are not staged.
- Click Apply, then Sync and check Sync Review.
Issue sheets for a permit set
- Load Sheets.
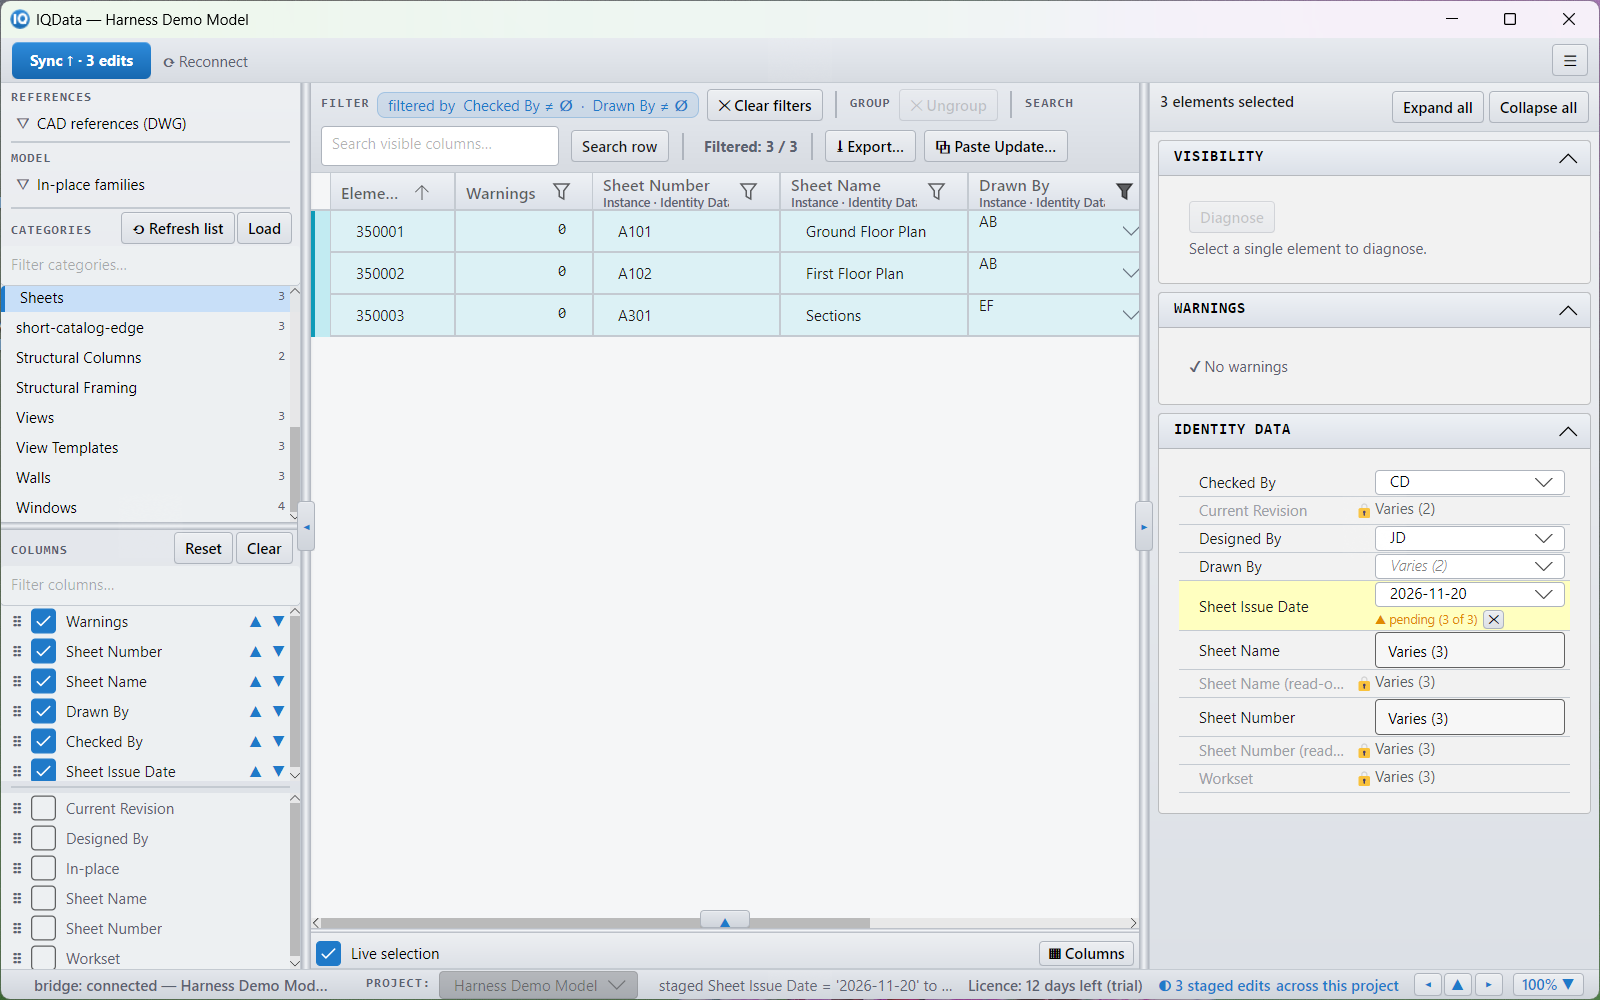
- Filter Checked By and Drawn By each by the condition is not blank. The filter bar shows them as Checked By ≠ Ø · Drawn By ≠ Ø, and the grid shows only the sheets that are ready to issue. Use Check sheets are complete first if some are missing.
- Press Ctrl+A (or select the sheets you are issuing), then type the issue date in the Inspector's Sheet Issue Date row. Fill any issue parameter your project uses the same way.
- Sync and check Sync Review.
- For a transmittal, keep the filter, choose the columns you want (Sheet Number, Sheet Name, Drawn By, Checked By, Sheet Issue Date), press Ctrl+E and export a CSV file.
Licence and account
Buy a licence
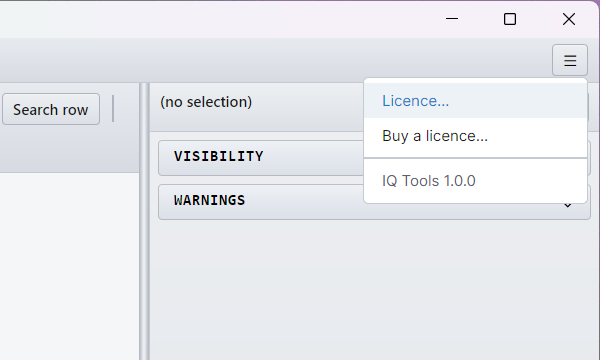
- Open the menu at the top right (☰, or F10).
- Choose Buy a licence…. The pricing page opens in your browser. You can also buy at iqtoolspro.com.
- Your licence key arrives by email.
Activate your licence
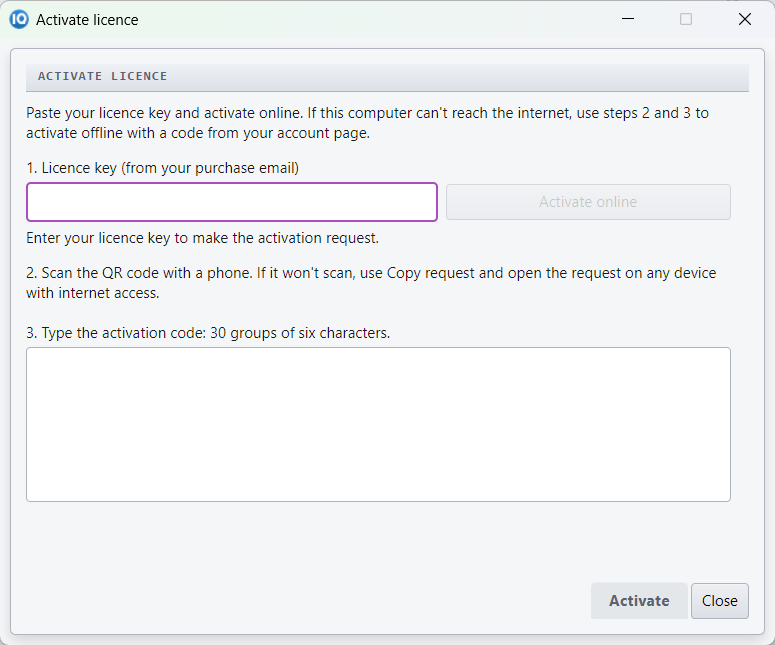
- Open the menu (☰) and choose Licence…, or click the licence text in the footer.
- Paste the licence key from your email and click Activate online.
- No internet on this computer? Type your key in the same window and it shows an activation request as a QR code and as text. On any device with internet, scan the QR code or open the request on the account page to get an activation code. Type the code (30 groups of six characters) into the window and click Activate with code.
- When the trial ends, editing stops until you activate. Your staged edits are kept.
Move your licence to another computer
- Email support@iqtoolspro.com and say which computer you are moving to. Please do not send your licence key.
Get help
- Email support@iqtoolspro.com with what you did, what you expected and what you saw. A screenshot helps.
- Attach the logs from the time it happened: the IQ Tools log in
%LOCALAPPDATA%\IQData\logs\and the Revit add-in log in%LOCALAPPDATA%\IQData\addin\logs\. Paste the path into File Explorer's address bar to open the folder.